이 글은 https://jangminhyeok.tistory.com/9 을 참고로 만든 글입니다.
저는 이 글을 따라하다가, AWS 설정 부분을 잘못하여 삽질을 하루동안 하였습니다.
여기 글이 매우 잘 정리되어있어서 저에게는 정말 큰 행운이었습니다.
좋은글 써주셔서 진심으로 감사드립니다.
PyQt5를 단일 exe 실행파일로 만드려는 목적 기준입니다.
PyQt5 기반으로 GUI 프로그램을 구현하고, PyInstaller를 활용하여 단일 실행파일로 만들 수 있습니다.
exe 파일 하나만 공유하면 되기 때문에 정말 간편하다보니 많이 사용되는 방법입니다.
① PyInstaller로 단일 exe 실행파일을 만들고 싶다.
② main 코드에서 버전 체크 및 업그레이드를 자동으로 해줬으면 좋겠다.
③ AWS S3나 Github repo에다가 버전 업그레이드된 exe 파일을 공유하고 싶다.
④ 내가 만든 단일 exe 실행파일은 PyQt5의 GUI 프로그램이다.
요약부분
# https://s3.ap-northeast-2.amazonaws.com/[bucket_name]/[bucket_key]

## 처음 배포 시 해야하는 것

1. pyupdater keys -c
   1. [app_name] -> y
2. pyupdater init
   1. [app_name] -> y
   2. [company_name] -> y
   3. https://s3.ap-northeast-2.amazonaws.com/[bucket_name]/[bucket_key] -> y
   4. N
   5. N
   6. python-pyupdate-aws
3. pyupdater keys -i
4. pyupdater make-spec -F -w main.py
5. pyupdater build --app-version=1.0.0 win.spec
6. pyupdater pkg --process --sign
7. pyupdater settings --plugin s3
   1. [bucket_name] -> y
   2. [bucket_key] -> y
   3. ap-northeast-2 -> y
8. pyupdater upload --service s3

# 재배포 시 해야하는 행위

1. pyupdater make-spec -F -w main.py
2. pyupdater build --app-version=2.0.0 win.spec
3. pyupdater pkg --process --sign
4. pyupdater upload --service s3

- 처음 만들어진 exe 파일을 실행해보면 자동으로 최신 버전을 다운받아 실행한다.
- 다만, exe파일이 루트경로와 같은 드라이브 내에 있어야 오류 없이 잘 동작한다.
#1 라이브러리 설치
우선 설치부터 시작해보겠습니다.
저의 파이썬 버전은 3.8.7이었습니다.
pip install pyinstaller dsdev-utils==1.0.5 PyUpdater==4.0 PyUpdater-S3-plugin==4.1.2
#2 CLI / Client 구분
PyUpdater의 공식 매뉴얼에서는 배포를 하는 입장인지, 다운로드를 하려는 입장인지에 따라 구분합니다.
- CLI : 배포를 하려는 입장으로써 터미널 내에 어떤 명령어를 입력할지가 주된 내용입니다
- Client : 버전을 체크하고 자동으로 업데이트 하려는 단일 exe 실행파일이자 Python 코드입니다.
Client 측면에서 먼저 Python 코드를 작성해야, 이어서 CLI로 배포할 exe 실행파일을 설정할 수 있습니다.
#3 Client에서 Python 코드 작성
[Step 1 - Imports & Constants]
from pyupdater.client import Client
from client_config import ClientConfig

APP_NAME = 'PyUpdater App'
APP_VERSION = '1.0.0'
필요한 라이브러리들을 불러오고, 변수를 설정해줍니다.
[Step 2 - Create callback]
def print_status_info(info):
    total = info.get(u'total')
    downloaded = info.get(u'downloaded')
    status = info.get(u'status')
    print(downloaded, total, status)
다운로드 Progress를 보기 위한 함수를 선언해줍니다.
[Step 3 - Initialize Client]
client = Client(ClientConfig(), refresh=True, progress_hooks=[print_status_info])
client.FROZEN = True
client.strategy = 'rename'
Step 1에서 import했던 ClientConfig는 나중에 CLI로 설정이 끝나면 client_config.py이 생성됩니다.
ClientConfig 클래스의 코드를 미리 보여드리자면 아래와 같습니다.
client.FROZEN = True의 경우에는 해당 코드를 참고 바랍니다.
True를 설정하면, AppUpdate(LibUpdate) 클래스로 return되어, 업데이트할 파일을 Binary 단위(?)로 봅니다.
False를 설정하면, LibUpdate 클래스로 return되어, 업데이트할 파일을 Asset 단위로 봅니다.
True 일때는 extract_restart() 메소드 사용이 가능하지만, False 일때는 불가능하여 extract()를 사용해야됩니다.
그런데 이 글이 작성되는 목적 자체가 단일 exe 실행파일에 대한 것이기 때문에 True로 설정되었습니다.
client.strategy의 경우에는 해당 코드를 참고 바랍니다.
기본 값은 'overwrite'로 설정되어 있습니다만, 'rename'으로 해줘야 단일 exe실행파일에 대해서는 작동합니다.
기존 파일의 이름을 .exe.old로 바꾸고, 새로 받아온 파일을 .exe로 해서 바꿔치기하는 개념입니다.
class ClientConfig(object):
    PUBLIC_KEY = 'aewhvjtvg_This_Is_Public_Key_akwtvwa'
    APP_NAME = 'PyUpdater App'
    COMPANY_NAME = 'JangMinHyeok'
    HTTP_TIMEOUT = 30
    MAX_DOWNLOAD_RETRIES = 3
    UPDATE_URLS = ['https://s3.ap-northeast-2.amazonaws.com/idont-know-bucket/bucket_key/']
제가 이해한 선에서 설명을 드리자면 아래와 같습니다.
- PUBLIC_KEY : 특정 파일을 GetObject하고자 사용하는 Key 값
- APP_NAME : 앱/프로그램 이름
- COMPANY_NAME : 개발자 이름 또는 회사 이름
- HTTP_TIMEOUT : 얼마 동안 Response 없어야 Timeout일지 시간 설정
- MAX_DOWNLOAD_RETRIES : 다시 다운로드를 시도하는 최대 횟수
- UPDATE_URLS : 업데이트된 파일이 위치할 URL
[Step 4 - Update Check]
app_update = client.update_check(APP_NAME, APP_VERSION, channel='stable')

# channel = ['alpha', 'beta', 'stable']
channel의 종류는 위와 같이 alpha, beta, stable로 나뉘며 이는 버전명 작성에 의존합니다.
client.update_check(name, version, channel)에서 FROZEN이 True이기 때문에 AppUpdate(LibUpdate)를 return 합니다.
만약 FROZEN이 False이면, LibUpdate가 return 됩니다. 그러면 단일 실행파일에 대해서는 오류납니다.
[Step 5 - Download Update]
if app_update is not None:
    app_update.download(background=False)

# background thread로 download하고 싶으면 True
[Step 6 - Overwrite / Restart]
# Extract and Overwrite current app
if app_update.is_downloaded():
    app_update.extract_overwrite()

# Extract and Overwrite and Restart the app
if app_update.is_downloaded():
    app_update.extract_restart()
방식에 따라서 두 가지로 나뉩니다만, 저희는 아래의 extract_restart()가 있는 구문으로 하겠습니다.
[requirements.txt]
requirements.txt도 첨부하겠습니다.
pip install -r requirements.txt
[main.py]
from pyupdater.client import Client
from qt_ui import MyWindow
from PyQt5.QtWidgets import *
from client_config import ClientConfig
import sys

APP_NAME = 'PyUpdater App'
APP_VERSION = '1.0.0'

def print_status_info(info):
    total = info.get(u'total')
    downloaded = info.get(u'downloaded')
    status = info.get(u'status')
    print(downloaded, total, status)


if __name__ == "__main__":
    client = Client(ClientConfig(), refresh=True, progress_hooks=[print_status_info])
    client.FROZEN = True
    client.strategy = 'rename'

    app_update = client.update_check(APP_NAME, APP_VERSION, channel='stable')

    if app_update is not None:
        app_update.download()

        if app_update.is_downloaded():
            app_update.extract_restart()

    # 업데이트 할 필요 없으면, PyQt5의 QApp 실행
    else:
        app = QApplication(sys.argv)
        myApp = MyWindow()
        myApp.show()
        sys.exit(app.exec_())
[qt_ui.py]
from PyQt5.QtWidgets import *
from PyQt5.QtGui import *
from PyQt5.QtCore import *

class MyWindow(QDialog):

    def __init__(self):
        super().__init__()
        self.initUI()

    def initUI(self):
        self.show()
#4 CLI으로 PyUpdater 설정
[Step 1 - Create Keypack]
$ pyupdater keys -c

[INFO] PyUpdater 4.0
407 INFO: PyUpdater 4.0
418 DEBUG: PyUpdater config data folder is missing
[ERROR] Not a PyUpdater repo: You must initialize your repository first
418 ERROR: Not a PyUpdater repo: You must initialize your repository first
Please enter app name - No Default Available
--> PyUpdater App
You entered PyUpdater App, is this correct?
[N/y]?y
90074 DEBUG: off_pri type: <class 'str'>
[INFO] Keypack placed in cwd
90075 INFO: Keypack placed in cwd
공식 매뉴얼에서는 보안을 위해, 인터넷 연결 안된 PC에서 Keypack 생성하고 그걸 가져오라고 합니다.
하지만 저는 귀찮아서 그냥 현재 개발하고 있는 PC의 프로젝트 root 디렉토리에서 바로 돌렸습니다.
아직 init를 안해서 app name을 입력하라고 나옵니다. 저는 Client 설정할 때 입력했던 PyUpdater App으로 했습니다.
[Step 2 - Copy Keypack]
$ scp dev-machine:keypack.pyu .Step 1에 이어서 keypack을 복사해서 가져오는 과정인데, 저처럼 귀찮아서 바로 돌리신 분은 생략해주세요.
[Step 3 - Init Repo]
$ pyupdater init

[INFO] PyUpdater 4.0
393 INFO: PyUpdater 4.0
Please enter app name
[DEFAULT] -> PyUpdater App
Press Enter To Use Default
--> PyUpdater App

You entered PyUpdater App, is this correct?
[N/y]?y

Please enter your name or company name
[DEFAULT] -> PyUpdater App
Press Enter To Use Default
--> JangMinHyeok

You entered JangMinHyeok, is this correct?
[N/y]?y

Enter a url to ping for updates. - No Default Available
--> https://s3.ap-northeast-2.amazonaws.com/idont-know-bucket/bucket_key/

You entered https://s3.ap-northeast-2.amazonaws.com/idont-know-bucket/bucket_key/, is this correct?
[N/y]?y

Would you like to add another url for backup?
[N/y]?N

Would you like to enable patch updates?
[Y/n]?n

Please enter the path to where pyupdater will write the client_config.py file. You'll need to import this file to initialize the update process.
Examples:

lib/utils, src/lib, src.

Leave blank to use the current directory
[DEFAULT] -> testtest
Press Enter To Use Default
-->

You entered testtest, is this correct?
[N/y]?y

[INFO] Creating pyu-data dir...
37492 INFO: Creating pyu-data dir...
37493 DEBUG: Creating config dir
37494 DEBUG: Config Dir: C:\Users\JangMinHyeok\projects\Python\testtest\.pyupdater
37494 DEBUG: Config DB: C:\Users\JangMinHyeok\projects\Python\testtest\.pyupdater\config.pyu
37495 DEBUG: Config Dir: C:\Users\JangMinHyeok\projects\Python\testtest\.pyupdater
37496 DEBUG: Config DB: C:\Users\JangMinHyeok\projects\Python\testtest\.pyupdater\config.pyu
37497 DEBUG: Config Dir: C:\Users\JangMinHyeok\projects\Python\testtest\.pyupdater
37497 DEBUG: Config DB: C:\Users\JangMinHyeok\projects\Python\testtest\.pyupdater\config.pyu
[INFO] Creating dir: C:\Users\JangMinHyeok\projects\Python\testtest\pyu-data
37497 INFO: Creating dir: C:\Users\JangMinHyeok\projects\Python\testtest\pyu-data
[INFO] Creating dir: C:\Users\JangMinHyeok\projects\Python\testtest\pyu-data\new
37498 INFO: Creating dir: C:\Users\JangMinHyeok\projects\Python\testtest\pyu-data\new
[INFO] Creating dir: C:\Users\JangMinHyeok\projects\Python\testtest\pyu-data\deploy
37499 INFO: Creating dir: C:\Users\JangMinHyeok\projects\Python\testtest\pyu-data\deploy
[INFO] Creating dir: C:\Users\JangMinHyeok\projects\Python\testtest\pyu-data\files
37500 INFO: Creating dir: C:\Users\JangMinHyeok\projects\Python\testtest\pyu-data\files
[WARNING] Version file not found
37501 WARNING: Version file not found
37502 DEBUG: Created new version file
37503 DEBUG: Creating new config file
37626 DEBUG: Config Dir: C:\Users\JangMinHyeok\projects\Python\testtest\.pyupdater
37627 DEBUG: Config DB: C:\Users\JangMinHyeok\projects\Python\testtest\.pyupdater\config.pyu
37628 DEBUG: Saving Config
37628 DEBUG: Syncing db to filesystem
37629 DEBUG: Config saved
37629 DEBUG: *** Keypack data is None ***
37629 DEBUG: Writing client_config.py
37630 DEBUG: Adding PUBLIC_KEY to client_config.py
37630 DEBUG: Adding APP_NAME to client_config.py
37630 DEBUG: Adding COMPANY_NAME to client_config.py
37630 DEBUG: Adding HTTP_TIMEOUT to cilent_config.py
37631 DEBUG: Adding MAX_DOWNLOAD_RETRIES to client_config.py
37631 DEBUG: Adding UPDATE_URLS to client_config.py
37631 DEBUG: Wrote client config
[INFO] Setup complete
37631 INFO: Setup complete
pyupdater init를 하면 입력해야 하는 것이 아래와 같이 있습니다.
- app name
- your name or company name
- a url to ping for updates
- (optional) a backup url to ping for updates
- (optional) enable patch updates or not
- path to write client_config.py file
1번, 2번은 설명이 필요 없으니 생략합니다.
3번은 버전체크 및 업데이트할 파일이 있는 URL입니다. 저의 경우에는 AWS S3의 버킷 주소를 입력했습니다.
4번은 백업 URL로 선택사항입니다. 5번은 n 을 입력하여 비활성화해주겠습니다.
6번은 client_config.py이 저장될 디렉토리입니다만, Enter 키 누르면 프로젝트 root 디렉토리로 설정됩니다.
[Step 4 - Import Keypack]
$ pyupdater keys -i

[INFO] PyUpdater 4.0
391 INFO: PyUpdater 4.0
403 DEBUG: Config Dir: C:\Users\JangMinHyeok\projects\Python\testtest\.pyupdater
403 DEBUG: Config DB: C:\Users\JangMinHyeok\projects\Python\testtest\.pyupdater\config.pyu
409 DEBUG: Config Dir: C:\Users\JangMinHyeok\projects\Python\testtest\.pyupdater
409 DEBUG: Config DB: C:\Users\JangMinHyeok\projects\Python\testtest\.pyupdater\config.pyu
416 DEBUG: Syncing db to filesystem
[INFO] Keypack import successfully
417 INFO: Keypack import successfully
417 DEBUG: Saving Config
418 DEBUG: Syncing db to filesystem
419 DEBUG: Config saved
419 DEBUG: Writing client_config.py
420 DEBUG: Adding PUBLIC_KEY to client_config.py
420 DEBUG: Adding APP_NAME to client_config.py
420 DEBUG: Adding COMPANY_NAME to client_config.py
421 DEBUG: Adding HTTP_TIMEOUT to cilent_config.py
421 DEBUG: Adding MAX_DOWNLOAD_RETRIES to client_config.py
421 DEBUG: Adding UPDATE_URLS to client_config.py
422 DEBUG: Wrote client config
생성하였던 Keypack을 프로젝트 root 디렉토리에 적용해주는 단계입니다.
[Step 5 - Integrate PyUpdater]
이 부분이 저희가 #2에서 설정해줬던 Client 부분입니다. 이미 했으므로 생략합니다.
[Step 6 - Make Spec]
$ pyupdater make-spec -F -w main.py

# To show pyinstaller build info use --pyinstaller-log-info
# -F argument : one file mode
# -w argument : hide cmd/terminal
세부적인 설정이 필요할때 spec 파일을 만듭니다.
PyQt5의 ui 파일을 단일 exe 실행파일에 포함하고자 할때는 이 링크를 참고 바랍니다.
윈도우에서 spec을 만드신 분들은 파일명이 'win.spec'으로 생성되었을 수도 있습니다.
[Step 7 - Build]
# Build from a spec file.
# In window, main.spec -> win.spec
$ pyupdater build --app-version=1.0.0 main.spec

# 윈도우의 경우 이렇게 하면 된다.
$ pyupdater build --app-version=1.0.0 win.spec

# Build from a script.
$ pyupdater build --app-version=1.0.0 main.py

# To show pyinstaller build info use --pyinstaller-log-info
빌드 단계입니다. spec 또는 py 파일을 빌드하냐에 따라서 두 가지 옵션으로 나뉩니다.
버전명 작성은 위에서 언급하였듯이 alpha, beta, stable에 따라 다릅니다. 이 링크를 참고 바랍니다.
[Step 8/9 - Create patches and Cryptographically sign]
$ pyupdater pkg --process --sign

# For CI/CD
$ pyupdater pkg --process --sign --split-version
Gets sha256 hashes, file sizes, adds meta-data to version manifest and copies files to deploy folder. If a source files is available, patches will also be created. You can combine --process with --sign. Now lets sign & gzip our version manifest, gzip our keyfile & place both in the deploy directory. Note that the signing process works without any user intervention. You can combine --sign with --process
위 명령어를 입력하면 pyu-data/files 내에 zip파일이 생깁니다.
저희는 단일 exe 실행파일 생성 모드로 하였기 때문에 압축풀면 exe 파일 하나가 있습니다.
여기까지가 사실상 빌드 과정이고, 이후로는 플러그인 설치나 AWS S3 설정입니다.
[Step 10 - List Installed Plugins]
# You can install the official plugins with
# pip install pyupdater[s3, scp]
# pip install PyUpdater-S3-plugin
# pip install PyUpdater-SCP-Plugin

$ pyupdater plugins

s3 by Digital Sapphire
scp by Digital Sapphire
AWS S3의 버킷에 파일을 업로드 하기 위해서는 PyUpdater-S3-plugin이 필요합니다.
저희는 이미 설치하였으므로 생략하도록 하겠습니다. 플러그인 설치 확인은 pyupdater plugins을 입력해주세요.
[Step 11 - Configure Plugin]
$ pyupdater settings --plugin s3

[INFO] PyUpdater 4.0
396 INFO: PyUpdater 4.0
407 DEBUG: Config Dir: C:\Users\JangMinHyeok\projects\Python\testtest\.pyupdater
407 DEBUG: Config DB: C:\Users\JangMinHyeok\projects\Python\testtest\.pyupdater\config.pyu

Please enter a bucket name - No Default Available
--> idont-know-bucket

You entered idont-know-bucket, is this correct?
[N/y]?y

Please enter a bucket key - No Default Available
--> bucket_key

You entered bucket_key, is this correct?
[N/y]?y

Please enter a bucket region - No Default Available
--> ap-northeast-2

You entered ap-northeast-2, is this correct?
[N/y]?y

15299 DEBUG: Saving Config
15300 DEBUG: Syncing db to filesystem
15301 DEBUG: Config saved
15301 DEBUG: Writing client_config.py
15302 DEBUG: Adding PUBLIC_KEY to client_config.py
15302 DEBUG: Adding APP_NAME to client_config.py
15302 DEBUG: Adding COMPANY_NAME to client_config.py
15303 DEBUG: Adding HTTP_TIMEOUT to cilent_config.py
15303 DEBUG: Adding MAX_DOWNLOAD_RETRIES to client_config.py
15303 DEBUG: Adding UPDATE_URLS to client_config.py
15303 DEBUG: Wrote client config
[INFO] Saved config
15304 INFO: Saved config
여기서는 설정해줘야 하는 것들이 아래와 같이 있습니다.
- bucket name
- bucket key
- bucket region
모두 필수 사항이며 AWS S3를 사용해보신 분들이라면 쉽게 설정 가능합니다.
bucket key는 파일 업로드될 디렉토리 경로라고 이해하였습니다만 정확하지는 않습니다. 이 링크를 참고 바랍니다.
AWS S3 버킷 생성 관련하여 튜토리얼이 필요하신 분은, 이 링크를 참고 바랍니다.
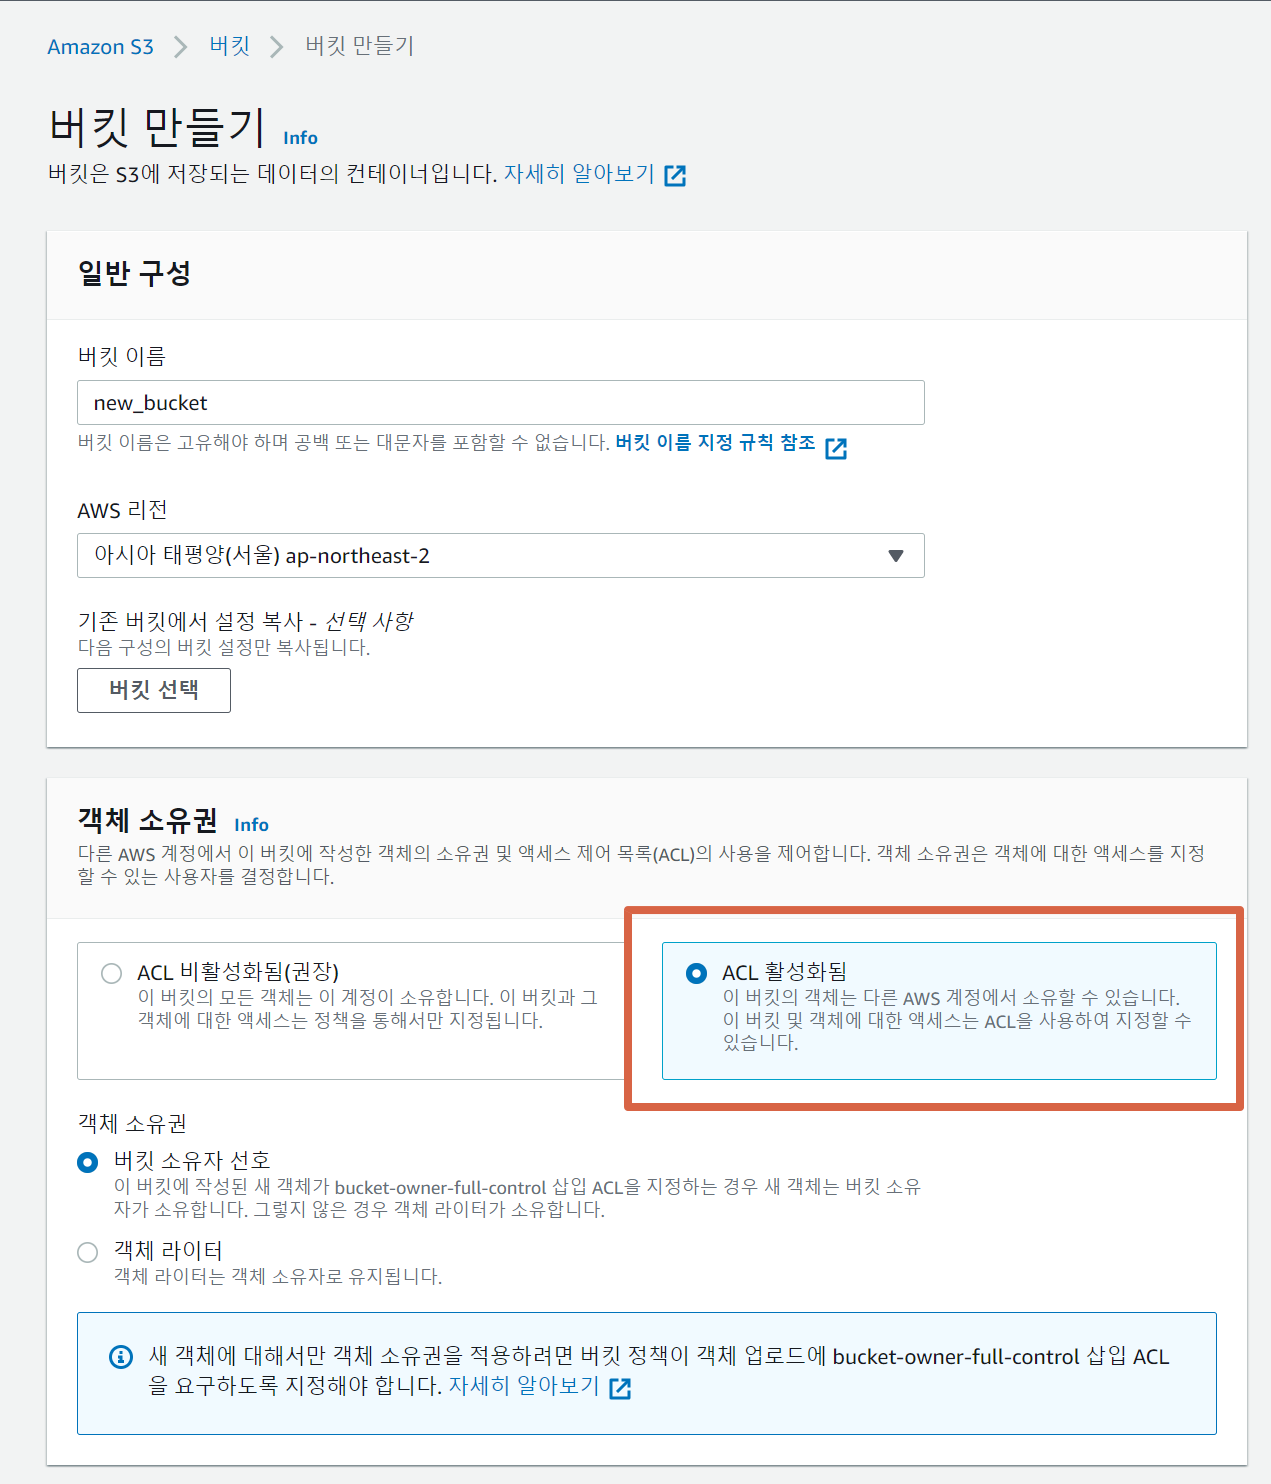
1. 버킷 생성

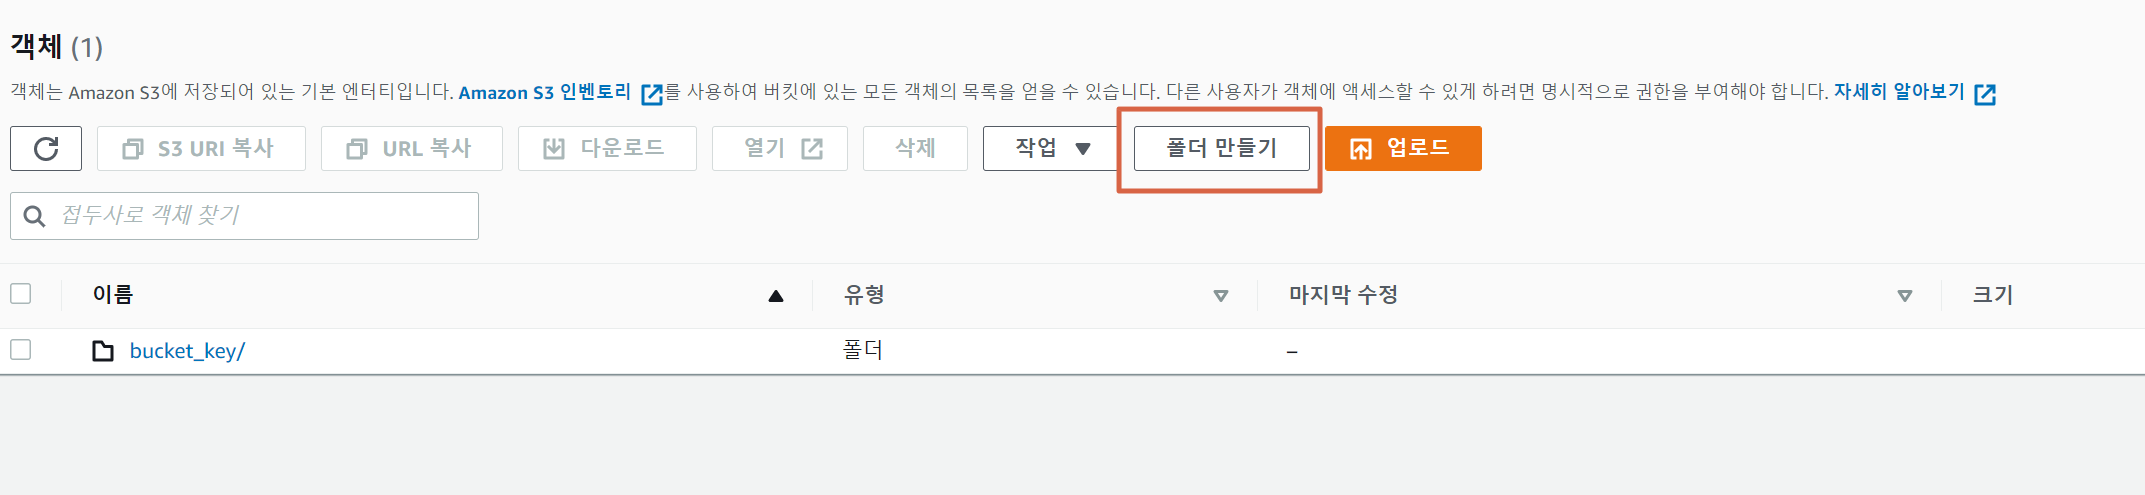
2. 폴더 만들기
폴더명은 bucket_key으로 했습니다.
폴더는 생성하지 않아도 자동으로 생성되지만 bucket_key가 뭔지 헷갈리는 부분이 있기 때문에
그냥 생성했습니다. bucket_key는 폴더명으로 보시면 됩니다.
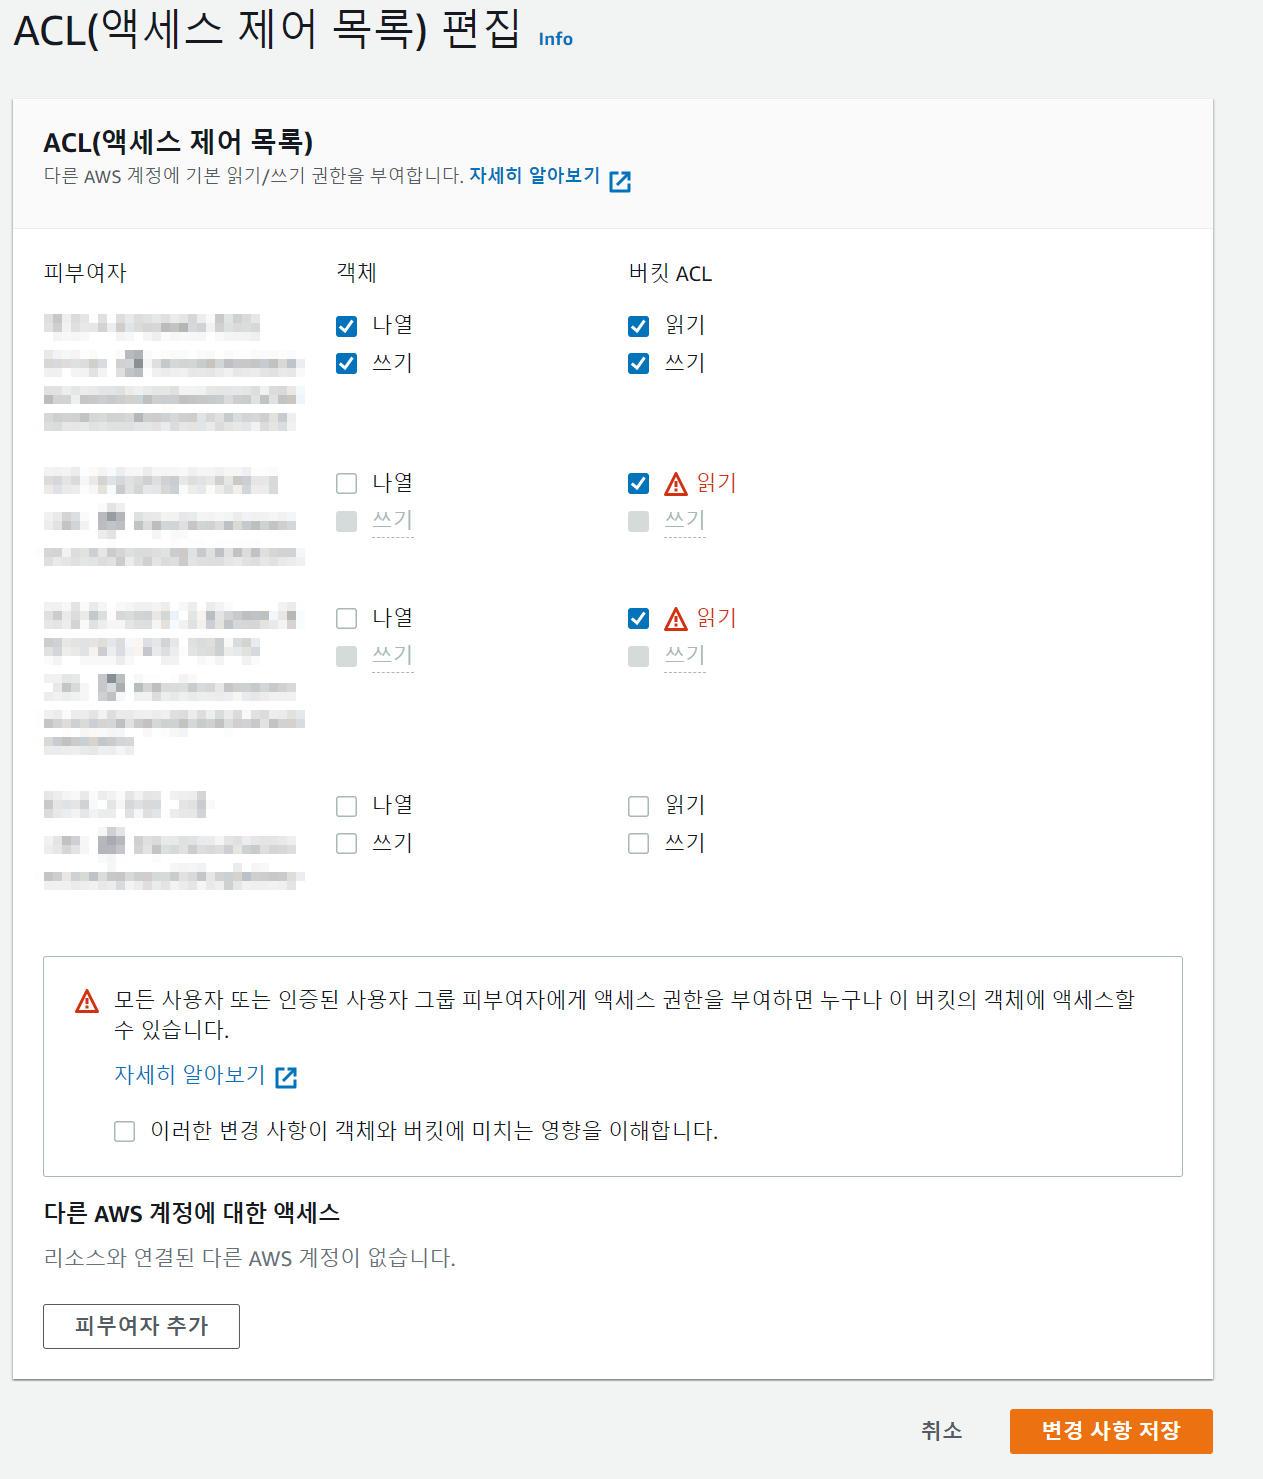
퍼블릭 액세스로 전부 풀어줬으며 아래와 같이 설정했습니다.
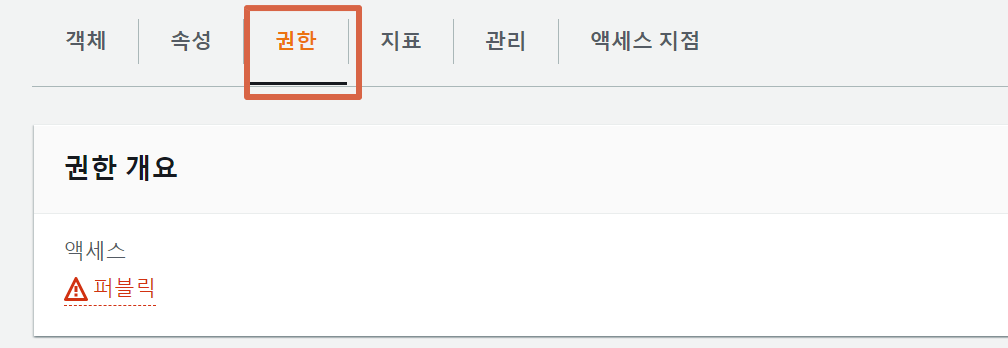
- 객체 소유권에서 ACL 활성화 : 버킷 소유자 선호
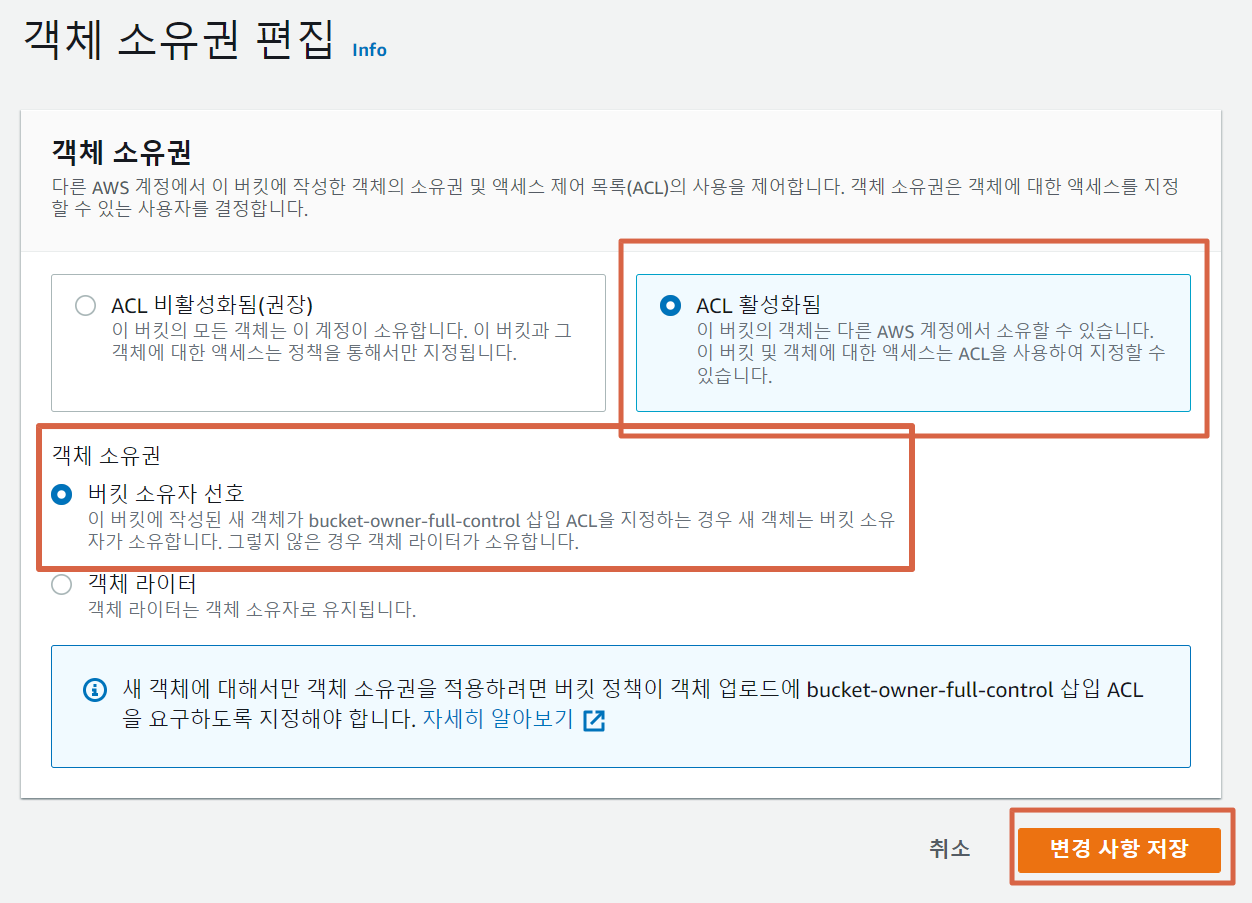
- 버킷 정책 : 없음
- ACL(액세스 제어 목록) : 모든 사람(읽기), 인증된 사용자 그룹(읽기)

[Step 11.5 - 환경변수에 AWS 액세스 키 설정]
PyUpdater-S3-Plugin을 활용하여 S3 버킷에 업로드하려고 하면 환경변수를 설정해줘야 합니다.
우선 보안 자격 증명(IAM) 에서 액세스 키(액세스 키 ID 및 비밀 액세스 키)를 발급 받았습니다.
다운로드된 root_key.csv는 잃어버리지 않게, 유출되지 않게 잘 보관하도록 합니다.
환경변수는 아래와 같이 설정해줬습니다.
PYU_AWS_ID : csv 파일의 AWSAccessKeyId
PYU_AWS_SECRET : csv 파일의 AWSSecretKey
[Step 12 - Upload]
$ pyupdater upload --service s3

[INFO] PyUpdater 4.0
502 INFO: PyUpdater 4.0
514 DEBUG: Config Dir: C:\Users\JangMinHyeok\projects\Python\testtest\.pyupdater
515 DEBUG: Config DB: C:\Users\JangMinHyeok\projects\Python\testtest\.pyupdater\config.pyu
519 DEBUG: Config Dir: C:\Users\JangMinHyeok\projects\Python\testtest\.pyupdater
520 DEBUG: Config DB: C:\Users\JangMinHyeok\projects\Python\testtest\.pyupdater\config.pyu
520 DEBUG: Config Dir: C:\Users\JangMinHyeok\projects\Python\testtest\.pyupdater
521 DEBUG: Config DB: C:\Users\JangMinHyeok\projects\Python\testtest\.pyupdater\config.pyu
521 DEBUG: Config Dir: C:\Users\JangMinHyeok\projects\Python\testtest\.pyupdater
522 DEBUG: Config DB: C:\Users\JangMinHyeok\projects\Python\testtest\.pyupdater\config.pyu
824 DEBUG: Requested uploader: s3
[INFO] Starting upload
824 INFO: Starting upload
[INFO] Plugin: S3
825 INFO: Plugin: S3
[INFO] Author: Digital Sapphire
825 INFO: Author: Digital Sapphire


Uploading: keys.gz - File 1 of 3

180 / 180.0  (100.00%)990 DEBUG: keys.gz uploaded successfully


Uploading: PyUpdater App-win-1.0.0.zip - File 2 of 3

57240348 / 57240348.0  (100.00%)8446 DEBUG: PyUpdater App-win-1.0.0.zip uploaded successfully
환경 변수까지 설정하고 나서야 업로드를 할 수 있습니다.
이제 AWS S3의 버킷을 확인해보면 파일이 업로드된걸 확인할 수 있습니다.

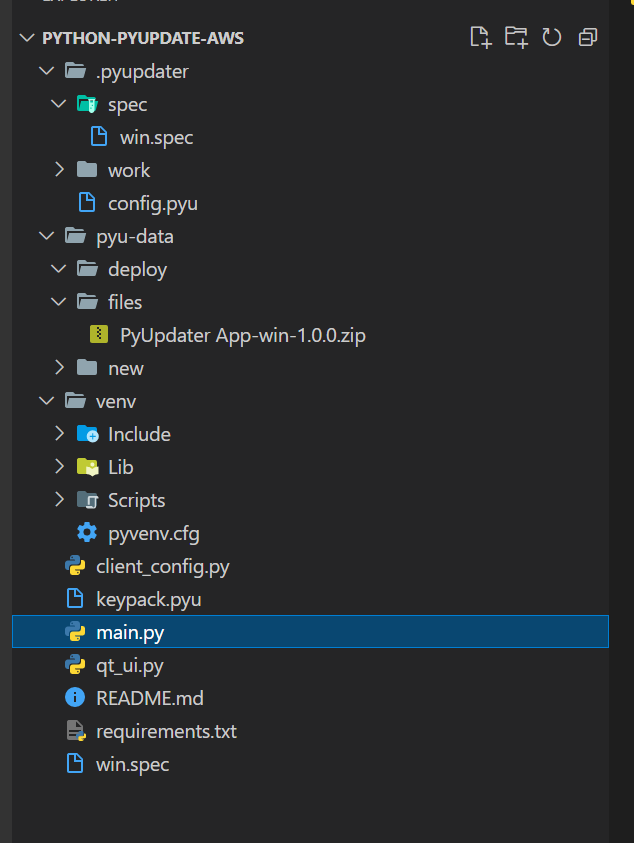
[정리]
1. PyQt5 코드를 작성 완료하여 main.py가 있다.

2. PyUpdater, PyUpdater-S3-Plugin, pyinstaller, dsdev-utils를 특정 버전 pip install 해준다.

3. main.py의 if __name__ == "__main__": 에다가 Client 설정을 해준다.

4. CLI로 PyUpdater를 설정해주고 1.0.0 버전을 업로드한다.


5. main.py 에서 수정할게 생겨서 좀 바꾸고, APP_VERSION 변수의 값을 바꿔준다 (ex: "1.0.1")

6. CLI로 PyUpdater를 설정해줄건데 Step 7 부터 시작한다. Build 할때 --app-version=1.0.1 로 바꿔줬다.

7. Step 8/9 하고 Step 12 업로드 한다.


8. 기존의 1.0.0 버전 exe 파일을 실행해본다.

9. 파일 다운로드하는데 시간이 좀 걸리고 나서, 프로그램이 실행된다.

10. 버전 업데이트된 파일이 실행됐는지 확인해본다.

[참고]
- 처음 만들어진 exe 파일을 실행해보면 자동으로 최신 버전을 다운받아 실행한다.
- 다만, exe파일이 루트경로와 같은 드라이브 내에 있어야 오류 없이 잘 동작한다.
출처: https://jangminhyeok.tistory.com/9
[PyUpdater] PyInstaller의 단일 실행파일 + 자동 업데이트 기능
PyQt5 기반으로 GUI 프로그램을 구현하고, PyInstaller를 활용하여 단일 실행파일로 만들 수 있습니다. exe 파일 하나만 공유하면 되기 때문에 정말 간편하다보니 많이 사용되는 방법입니다. 여기서 그
jangminhyeok.tistory.com
'프로그래밍 > python' 카테고리의 다른 글
| [Python] 구글 드라이브 API로 폴더 만들어보기 (0) | 2022.06.14 |
|---|---|
| python dictionary to json (0) | 2022.06.14 |
| pyinstaller 자동업데이트 github 연동 (0) | 2022.06.08 |
| 파이썬 자동업데이트 구현 참조 WinSparkle (0) | 2022.06.08 |
| 파이썬 pyinstaller google colud vision 사용 시 오류 발생 될 때 (0) | 2022.05.11 |